Installing a DNS Server
BACK
This tutorial will help you install a DNS server so you can run your own domain from your server, rather than using your registrars name servers. It is very complicated and this tutorial must be followed with due care and attention to make sure it goes smoothly. You MUST have furfilled ALL of the requirements before continuing this tutorial. If you get this wrong your domain could go totally offline, leaving your website offline and e-mail inaccessible. If you have a spare domain you don't use it might be worth testing it out on that first instead of your main production domain.
Now the tutorial may look long, but its really not! Its because of the amount of images I have provided to help you understand how the DNS system works. It shouldn't take you more than 15-20 minutes to carry out this tutorial. The longest part is the propagation wait for your domain which is out of your hands.
You must have:
- Windows Server (any edition)
- 2 STATIC INTERNET IP addresses routed to the same server (1 will work, but is not recommended, and it MUST be STATIC)*
- A domain that allows its DNS servers to be changed
- Knowledge of how DNS records function
- Port 53 unblocked on your firewall, both TCP and UDP (DNS service)
- Very reliable connection and server (your connection or server goes down, so does your domain!)
- Patience, and lots of it
* If you only have 1 IP then miss out all steps that include "ns2.yourdomain.com" since you will only have one. This single IP MUST be STATIC or the DNS system won't work. It should be noted that not all registrars allow a single name server to be used, but must use two or more. Check this before proceeding if in doubt.
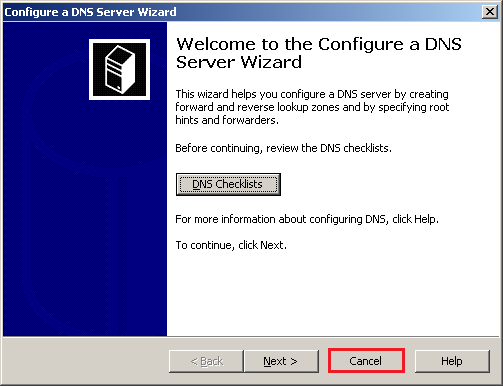
When you get the Configure a DNS Server Wizard, click Cancel.
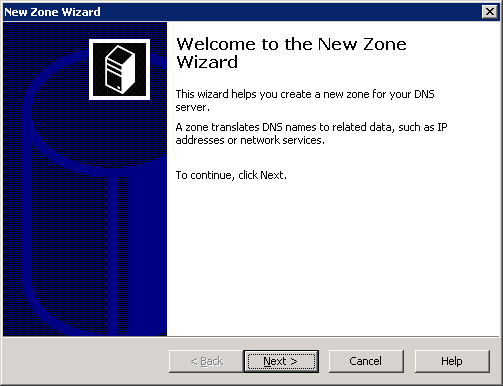
You will be presented with the following window.
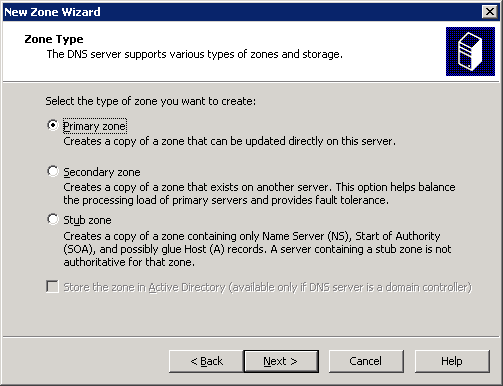
Click next and you will get another window. Select Primary Zone (default).
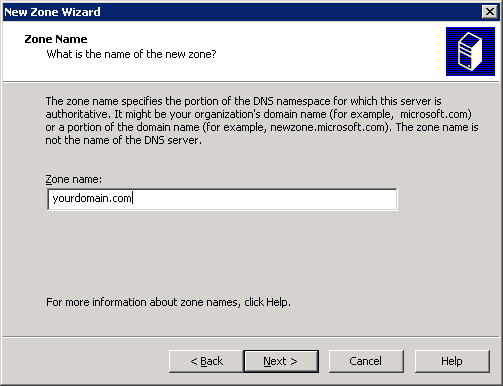
Click next and you will get a window asking you to enter your domain name. Enter it without the www. part in front of the name. Then click next.
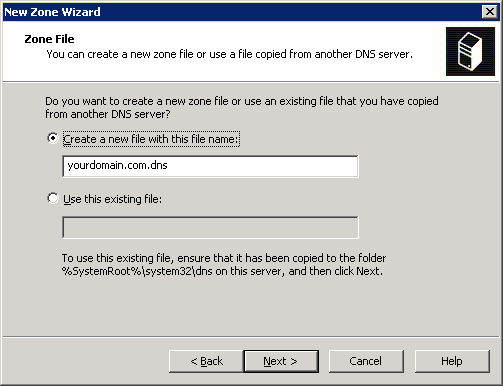
On this screen, simply click next.
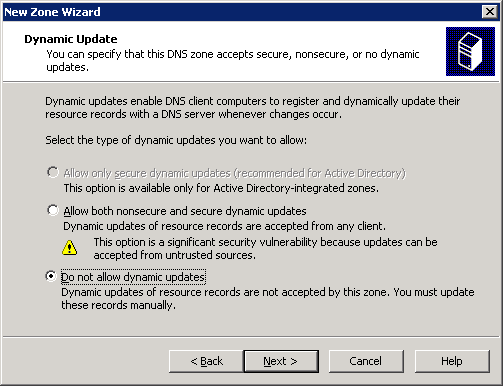
Again on this screen, simply click next.
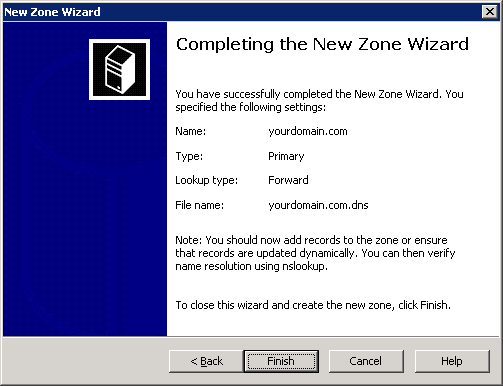
The new domain setup wizard is now finished, so select finish.
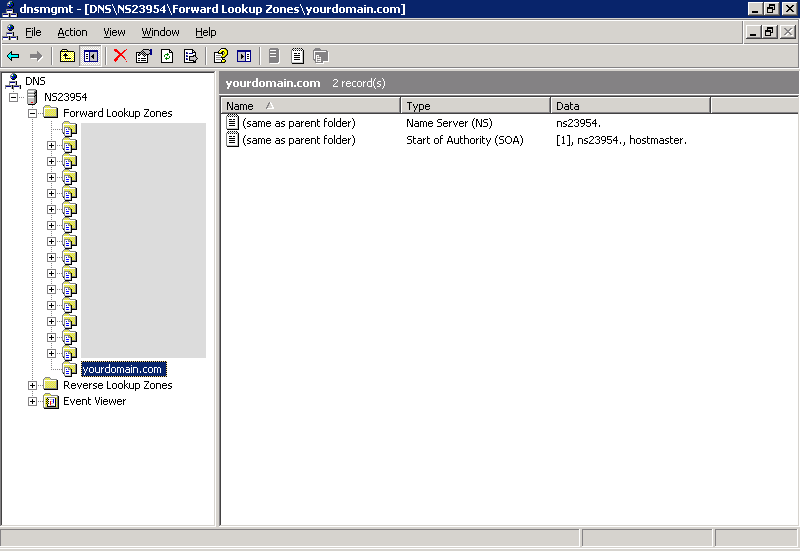
Now you will be presented with the following screen with your new domain entered.
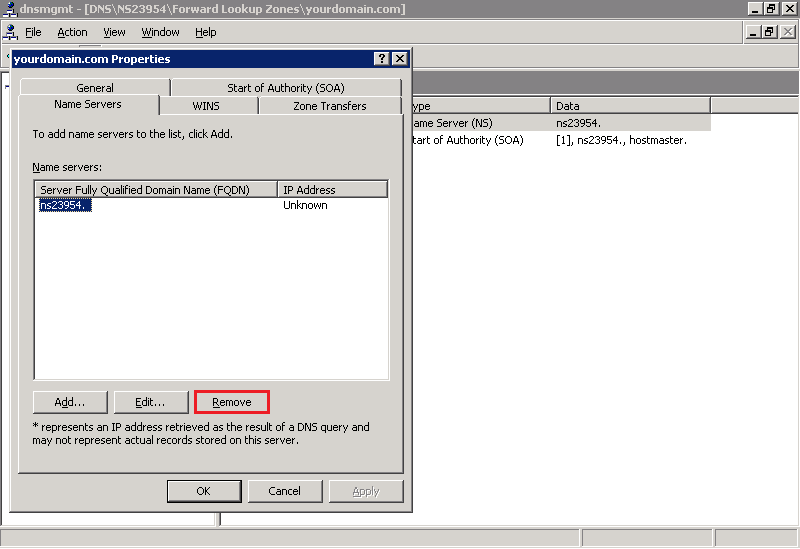
Now double click on the top most entry labelled "Name Server (NS)". A box will appear. Delete the entry as shown in the image below.
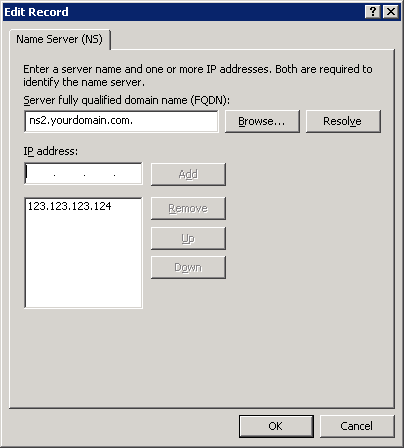
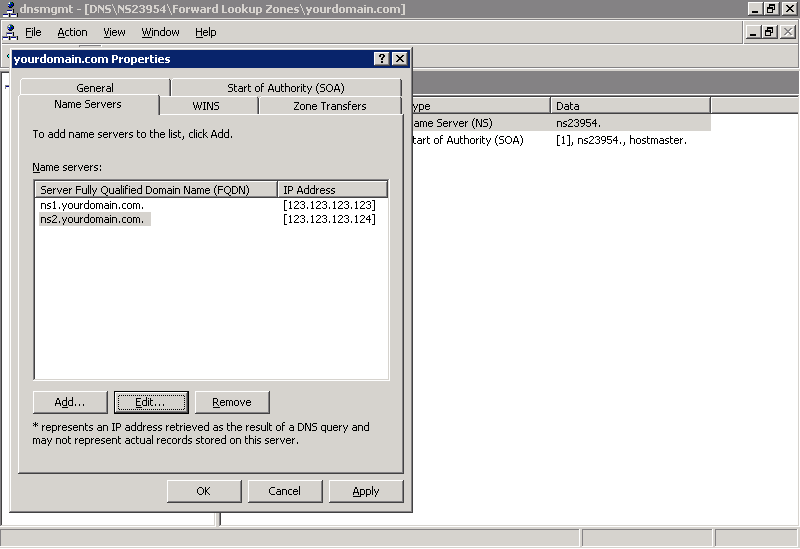
Now click Add and enter ns1.yourdomain.com and its IP address. Click OK, then click Add again and enter ns2.yourdomain.com and its IP address, making two separate entries.
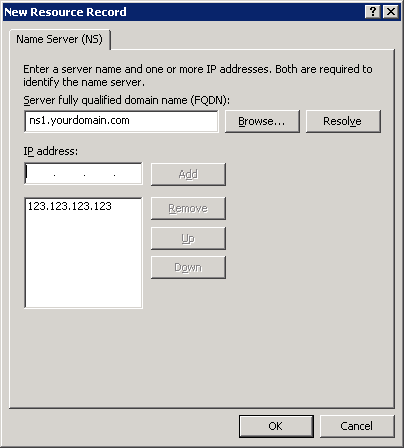
You should now have both entries as shown below. If you do click Apply, then OK, and proceed to the next step.
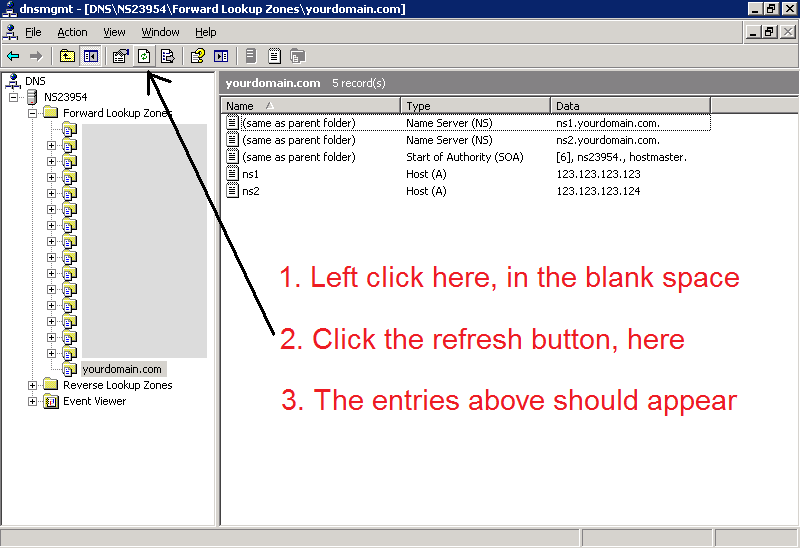
For this step, follow the instructions in the image below. There is a small glitch which requires you to do this to be able to see the entries that were automatically added.
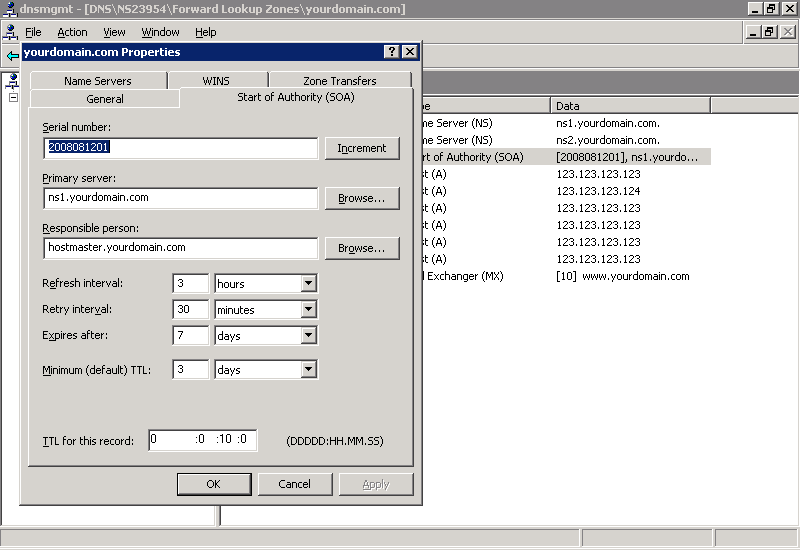
Now double click on the "Start of Authority (SOA)" record and a box will appear. You need to fill in the boxes precisely or the DNS system will not work.
Because of some registrars having such bad servers, and in an aid to reduce their load, you must set the update and refresh intervals etc differently from their defaults. Now while this won't affect you it will affect the checking test later in this tutorial, so in order to pass it you must set them to the correct values.
When you have done this you can click Apply then OK. The main window will update to reflect the changes.
Next we can finally get round to telling the server where to direct when someone connects to your domain, using the A records you should already know about. This is very simple to do.
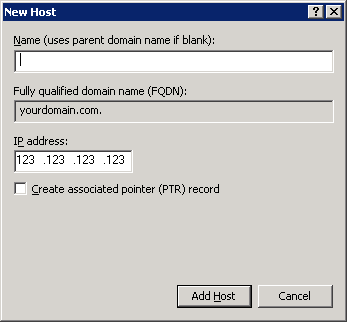
First, right click in an open space on the window, and select New Host (A). A box will appear.
Here, enter what you see in the boxes below, of course substituting your main IP for the one used in the box. You need at least these two entries for a fully working website.

Now you have entered these two records, you can click Cancel to stop adding more. The window will have updated to reflect your changes with these two new records.
Now, you will most likely be running a mail server, so we need to add some records for that to work correctly. If you're not running a mail server you can skip this step.
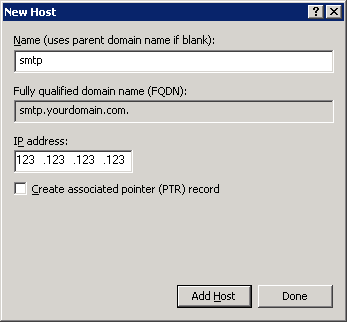
We can begin with two more A records, so as before, right click and select New Host (A). Add, as above, two new records but this time use smtp and pop like we did with www.

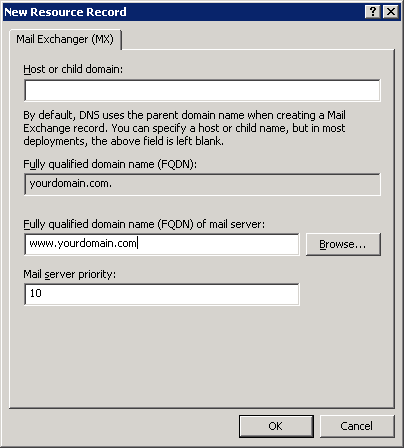
When you're finished, click Done. Now we need to add the MX record, which tells each mail server that sends you mail which IP to send it to. Right click and select "New Mail Exchanger (MX)" and a box will appear.
It is slightly different than before but works the same way.
Leave the first box blank but enter your full domain name into the second box. Leave the mail server priority on 10, and click OK.
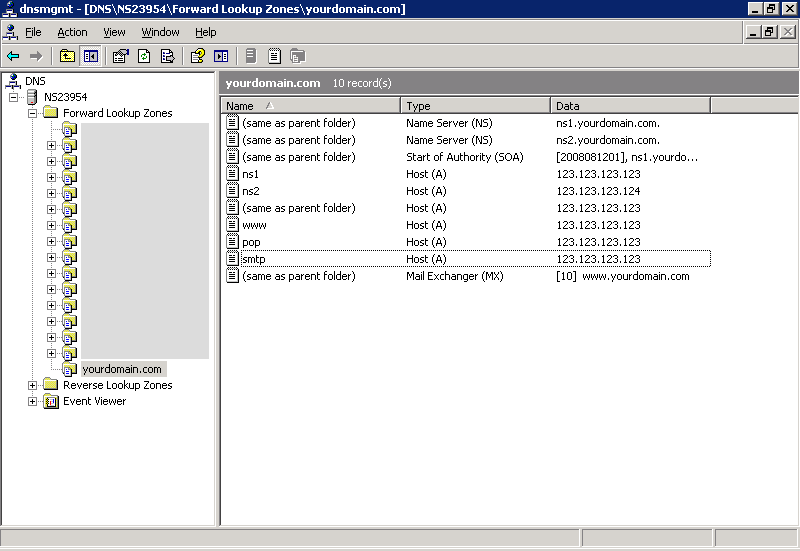
The window will have updated to reflect your changes.
The DNS server is now configured, however, your domain has not yet been told to use it yet! The next few steps will instruct you on how to do this. It varies on a per registrar basis but the general concept is the same.
There are ways to check what name server your domains is currently using and I will explain how to do that very soon.
To start with however we need to check that your server is correctly configured. Thankfully there are websites out there that allow you to do this. If there are any errors you can correct it before you transfer your domain to a broken DNS server.
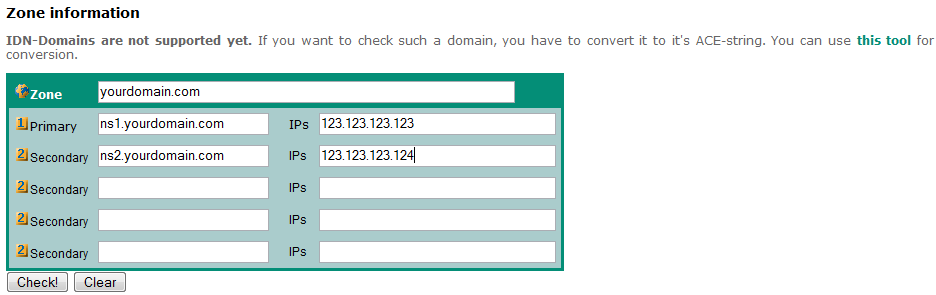
Using http://zonecheck.denic.de/zonecheck/en you can check your DNS server is functioning.
Simply enter in the boxes below Zone Information your domain name in the form "yourdomain.com" and your two name servers, "ns1.yourdomain.com" and its IP, and then "ns2.yourdomain.com" and its IP. Then click check. It takes up to 60 seconds to perform the test and afterwards you should get some results.
At the bottom of the page there should be a Final Status which will indicate a failure or a pass. If it passes you can continue with the rest of this tutorial. If it fails you need to read what it has failed on and attempt to fix it. If you followed this tutorial word for word you will have a passed domain.
When you get a pass on your domain, we can finally transfer the domain to your DNS server. This varies amongst registrars but I'll show you how to do mine as it should be very similar.
Basically its a case of finding out in your control panel where to change the DNS server or name server. The name is used differently between different registrars. When you find it, remove the registrars servers and enter your own, like the following.
After entering your servers, click Accept, or OK. Your registrar should give you a confirmation on the page that the servers have been changed. Now its a waiting game while the worlds DNS servers propagate.
You can check the progress very simply by visiting certain websites which give the name servers of your domain. The ones I use are below and work very well.
Network-Tools: http://www.network-tools.com - Select "DNS Records" button and enter your domain name in the box, then click submit.
Pingability: www.pingability.com - Enter your domain name in the quick check box then click check domain. When the check is complete scroll down to "yourdomain.com Name Servers".
If the outcome is something like this, or contains the same information as this:
Then your domain is configured to your server. Otherwise it will contain ns.yourregistrar.com or similar.
If after 3 days you have still not seen a change to your server, then contact your registrar to find out why it has not changed yet, and state you have waited 72+ hours.
Thats it! Your DNS server should now be functioning! Now that was worth it, wasn't it?! =]
Tips on getting online
Installing Abyss Web Server
Installing Selisoft Active HTML
Installing hMailServer Mail Server
Installing MySQL Database Server v4.0.24
Installing MySQL Database Server v4.1
Installing PHP
Installing phpBB
Installing phpMyAdmin
Installing ActiveState Ruby on Rails
Port forward your router
Or go back to the AbyssUnderground homepage
What is a DNS Server?
A DNS server is a server that translates alphanumeric names such as www.google.com into a numerical value you will know as an IP addess, in the form 123.123.123.123. There are two types of DNS server. One that simply translates domains into their IP address and others that host the records, known as name servers. However the general term for both of these is a DNS server, and that is why it is often confused.This tutorial will help you install a DNS server so you can run your own domain from your server, rather than using your registrars name servers. It is very complicated and this tutorial must be followed with due care and attention to make sure it goes smoothly. You MUST have furfilled ALL of the requirements before continuing this tutorial. If you get this wrong your domain could go totally offline, leaving your website offline and e-mail inaccessible. If you have a spare domain you don't use it might be worth testing it out on that first instead of your main production domain.
Now the tutorial may look long, but its really not! Its because of the amount of images I have provided to help you understand how the DNS system works. It shouldn't take you more than 15-20 minutes to carry out this tutorial. The longest part is the propagation wait for your domain which is out of your hands.
Step 1: Requirements
In order to run your own DNS server, you must furfil the following requirements, or it simply won't work.You must have:
- Windows Server (any edition)
- 2 STATIC INTERNET IP addresses routed to the same server (1 will work, but is not recommended, and it MUST be STATIC)*
- A domain that allows its DNS servers to be changed
- Knowledge of how DNS records function
- Port 53 unblocked on your firewall, both TCP and UDP (DNS service)
- Very reliable connection and server (your connection or server goes down, so does your domain!)
- Patience, and lots of it
* If you only have 1 IP then miss out all steps that include "ns2.yourdomain.com" since you will only have one. This single IP MUST be STATIC or the DNS system won't work. It should be noted that not all registrars allow a single name server to be used, but must use two or more. Check this before proceeding if in doubt.
Step 2: Installing the server
You can install the DNS server by going to Control Panel > Administrative Tools > Manage your Server and Add new role, and selecting DNS. It is straight forward and has step by step instructions. You may need your Windows Server disk to install certain system files for this step.When you get the Configure a DNS Server Wizard, click Cancel.
Step 3: Adding your first domain
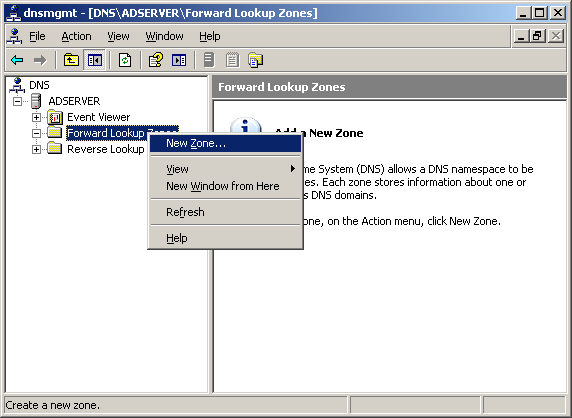
Open up the DNS configuration window located at Control Panel > Administrative Tools > DNS. Begin by right clicking Forward Lookup Zone and selecting New Zone.
You will be presented with the following window.
Click next and you will get another window. Select Primary Zone (default).
Click next and you will get a window asking you to enter your domain name. Enter it without the www. part in front of the name. Then click next.
On this screen, simply click next.
Again on this screen, simply click next.
The new domain setup wizard is now finished, so select finish.
Now you will be presented with the following screen with your new domain entered.
Now double click on the top most entry labelled "Name Server (NS)". A box will appear. Delete the entry as shown in the image below.
Now click Add and enter ns1.yourdomain.com and its IP address. Click OK, then click Add again and enter ns2.yourdomain.com and its IP address, making two separate entries.
You should now have both entries as shown below. If you do click Apply, then OK, and proceed to the next step.
For this step, follow the instructions in the image below. There is a small glitch which requires you to do this to be able to see the entries that were automatically added.
Now double click on the "Start of Authority (SOA)" record and a box will appear. You need to fill in the boxes precisely or the DNS system will not work.
Serial number: This must conform to the following series of numbers > YYYYMMDDnn

YYYY = Date, e.g. 2008
MM = Month, e.g. 08 (for August)
DD = Day, e.g. 12 (for the 12th)
nn = Incrememnt number. Set this to 01 to begin with. It will auto increment as you update records.
     In the example I have used "2008081201" which is 12th August 2008, increment 01.

Primary Server:     "ns1.yourdomain.com"
Responsible Person: "hostmaster.yourdomain.com"
Because of some registrars having such bad servers, and in an aid to reduce their load, you must set the update and refresh intervals etc differently from their defaults. Now while this won't affect you it will affect the checking test later in this tutorial, so in order to pass it you must set them to the correct values.
Refresh interval:      3 hours
Retry interval:        30 minutes
Expires after:         7 days
Minimum (default) TTL: 3 days

TTL for this record:   0:0:10:0 (10 minutes)
When you have done this you can click Apply then OK. The main window will update to reflect the changes.
Next we can finally get round to telling the server where to direct when someone connects to your domain, using the A records you should already know about. This is very simple to do.
First, right click in an open space on the window, and select New Host (A). A box will appear.
Here, enter what you see in the boxes below, of course substituting your main IP for the one used in the box. You need at least these two entries for a fully working website.
Now you have entered these two records, you can click Cancel to stop adding more. The window will have updated to reflect your changes with these two new records.
Now, you will most likely be running a mail server, so we need to add some records for that to work correctly. If you're not running a mail server you can skip this step.
We can begin with two more A records, so as before, right click and select New Host (A). Add, as above, two new records but this time use smtp and pop like we did with www.
When you're finished, click Done. Now we need to add the MX record, which tells each mail server that sends you mail which IP to send it to. Right click and select "New Mail Exchanger (MX)" and a box will appear.
It is slightly different than before but works the same way.
Leave the first box blank but enter your full domain name into the second box. Leave the mail server priority on 10, and click OK.
The window will have updated to reflect your changes.
The DNS server is now configured, however, your domain has not yet been told to use it yet! The next few steps will instruct you on how to do this. It varies on a per registrar basis but the general concept is the same.
Step 4: Configure your domain to use your DNS server
This step is the part that takes the time. Because of something known as "propagation" it can take up to 72 hours for all the DNS servers around the world to know which name servers the domain is supposed to use. Assuming you have configured your domain correctly on your own server, the transfer from one name server to another should be invisibile to your website visitors and even to yourself.There are ways to check what name server your domains is currently using and I will explain how to do that very soon.
To start with however we need to check that your server is correctly configured. Thankfully there are websites out there that allow you to do this. If there are any errors you can correct it before you transfer your domain to a broken DNS server.
Using http://zonecheck.denic.de/zonecheck/en you can check your DNS server is functioning.
Simply enter in the boxes below Zone Information your domain name in the form "yourdomain.com" and your two name servers, "ns1.yourdomain.com" and its IP, and then "ns2.yourdomain.com" and its IP. Then click check. It takes up to 60 seconds to perform the test and afterwards you should get some results.
At the bottom of the page there should be a Final Status which will indicate a failure or a pass. If it passes you can continue with the rest of this tutorial. If it fails you need to read what it has failed on and attempt to fix it. If you followed this tutorial word for word you will have a passed domain.
When you get a pass on your domain, we can finally transfer the domain to your DNS server. This varies amongst registrars but I'll show you how to do mine as it should be very similar.
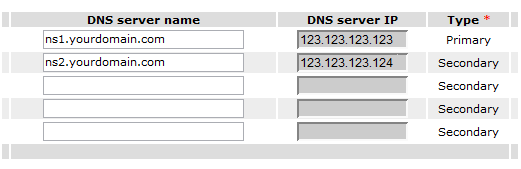
Basically its a case of finding out in your control panel where to change the DNS server or name server. The name is used differently between different registrars. When you find it, remove the registrars servers and enter your own, like the following.
After entering your servers, click Accept, or OK. Your registrar should give you a confirmation on the page that the servers have been changed. Now its a waiting game while the worlds DNS servers propagate.
You can check the progress very simply by visiting certain websites which give the name servers of your domain. The ones I use are below and work very well.
Network-Tools: http://www.network-tools.com - Select "DNS Records" button and enter your domain name in the box, then click submit.
Pingability: www.pingability.com - Enter your domain name in the quick check box then click check domain. When the check is complete scroll down to "yourdomain.com Name Servers".
If the outcome is something like this, or contains the same information as this:
DNS servers
ns2.yourdomain.com [123.123.123.124]
ns1.yourdomain.com [123.123.123.123]

Answer records
yourdomain.com	1	A	123.123.123.123	600s
yourdomain.com	1	NS	ns1.yourdomain.com	3600s
yourdomain.com	1	NS	ns2.yourdomain.com	3600s
yourdomain.com	1	SOA	server:	ns1.yourdomain.com   600s
				email:	hostmaster@yourdomain.com
				serial:	2008081203
				refresh:	900
				retry:	600
				expire:	86400
				minimum ttl:	600
yourdomain.com	1	MX	preference:	10   600s
				exchange:	yourdomain.com

Authority records

Additional records
ns1.yourdomain.com	1	A	123.123.123.123	3600s
ns2.yourdomain.com	1	A	123.123.123.124	3600s
yourdomain.com		1	A	123.123.123.123	600s
Then your domain is configured to your server. Otherwise it will contain ns.yourregistrar.com or similar.
If after 3 days you have still not seen a change to your server, then contact your registrar to find out why it has not changed yet, and state you have waited 72+ hours.
Thats it! Your DNS server should now be functioning! Now that was worth it, wasn't it?! =]
Finished
Troubleshooting
## DNS Server not detected by the tests ##
Check that your firewall and router is allowing port 53 on TCP AND UDP to pass through it. Failure to do so will prevent the DNS data from passing through it.
## My website doesn't work when I leave out the www. part ##
You didn't correctly add the A record that allows www.yourdomain.com to work. Scroll up to the part about A records and review your settings in accordance with the tutorial.
## I never get any e-mail ##
Did you set up an MX record correctly? Use the tutorial to check. Is your mail server running?
If you have any other problems please feel free to contact me using the form on the contact page.
Related Pages
Tips on getting online
Installing Abyss Web Server
Installing Selisoft Active HTML
Installing hMailServer Mail Server
Installing MySQL Database Server v4.0.24
Installing MySQL Database Server v4.1
Installing PHP
Installing phpBB
Installing phpMyAdmin
Installing ActiveState Ruby on Rails
Port forward your router
Or go back to the AbyssUnderground homepage