Installing MySQL Database Server Version 4.1
BACK
NOTE: MySQL 4.1 only works with PHP version 5. It does not work with PHP version 4. Take this into account when installing.
NOTE: MySQL 4.1 only works with PHP version 5. It does not work with PHP version 4. Take this into account when installing.
Step 1: Downloading
If you have downloaded a complete package, you will already have one of the files below. However if you haven't you need to download the MySQL Database package. You can get it from
http://dev.mysql.com/get/Downloads/MySQL-4.1/mysql-4.1.22-win32.zip/from/pick
Start "setup.exe" and keep clicking "Next" until the install sequence begins.
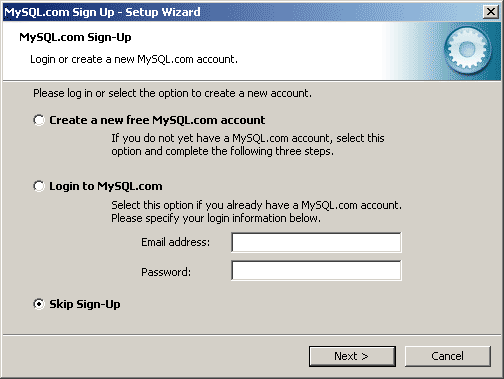
When you are given the screen below, click "Skip Sign-up"
On the next screen, click "Finish" to start the configuration wizard.
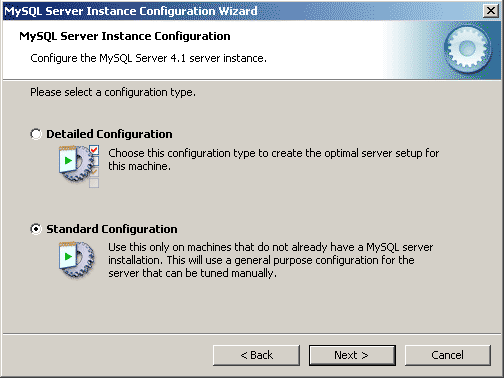
Select "Standard Configuration" and click "Next"
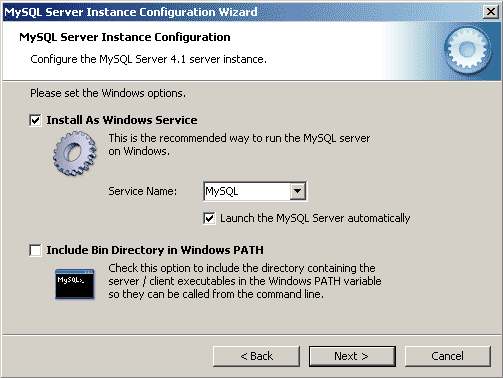
On the next screen, check the "Install As Windows Service" and "Launch the MySQL Server automatically"
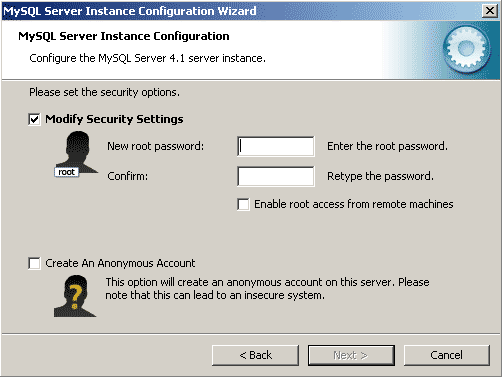
On the next screen, you are asked to enter a new ROOT password. Enter a password you can remember as you need this for the server to work with your MySQL applications.
Click "Next" and then "Execute" on the screen below to finish the configuration.
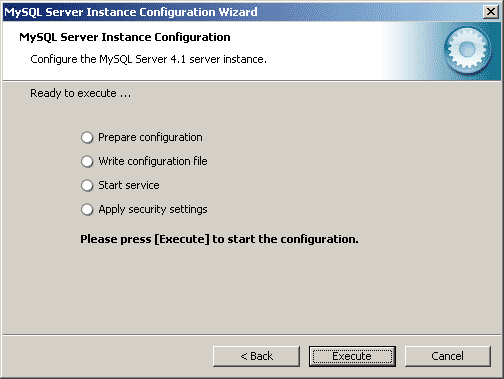
Once the finish button appears, click it to finish the configuration.
It should start each time Windows does automatically. If it does not start or fails to work correctly, then go to:
Control Panel, Administrative Tools, Services. Find "MySQL" and right click it, click "Start". Thats it. MySQL is now installed and working.
Continue to the phpMyAdmin tutorial so you can configure users and tables with ease.
Tips on getting online
Change the Index File
Installing Abyss Web Server
Installing Selisoft Active HTML
Installing a DNS Server
Installing MySQL Database Server v4.0.24
Installing ActiveState Perl
Installing PHP
Installing phpMyAdmin
Installing ActiveState Python
Port forward your router
Or go back to the AbyssUnderground homepage
http://dev.mysql.com/get/Downloads/MySQL-4.1/mysql-4.1.22-win32.zip/from/pick
Step 2: Installing
To begin, extract "setup.exe" to a suitable folder.Start "setup.exe" and keep clicking "Next" until the install sequence begins.
When you are given the screen below, click "Skip Sign-up"

On the next screen, click "Finish" to start the configuration wizard.
Step 3: Configuring
When the configuration screen comes up, click "Next" and you will be shown the screen below
Select "Standard Configuration" and click "Next"
On the next screen, check the "Install As Windows Service" and "Launch the MySQL Server automatically"

On the next screen, you are asked to enter a new ROOT password. Enter a password you can remember as you need this for the server to work with your MySQL applications.

Click "Next" and then "Execute" on the screen below to finish the configuration.

Once the finish button appears, click it to finish the configuration.
Step 4: Start the Server
After you clicked "Execute" in the last step, MySQL was started and will appear in Task Manager as "mysqld-nt.exe".It should start each time Windows does automatically. If it does not start or fails to work correctly, then go to:
Control Panel, Administrative Tools, Services. Find "MySQL" and right click it, click "Start". Thats it. MySQL is now installed and working.
Continue to the phpMyAdmin tutorial so you can configure users and tables with ease.
Finished
Related Pages
Tips on getting online
Change the Index File
Installing Abyss Web Server
Installing Selisoft Active HTML
Installing a DNS Server
Installing MySQL Database Server v4.0.24
Installing ActiveState Perl
Installing PHP
Installing phpMyAdmin
Installing ActiveState Python
Port forward your router
Or go back to the AbyssUnderground homepage