Routers: Setting a Static LAN IP Address
BACK
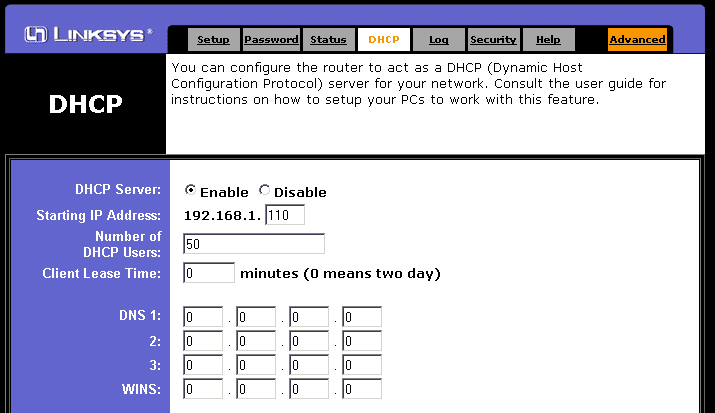
Mine looks like this:

My router has the "Starting IP Address" as the field we need to set. I set mine to 192.168.1.110 as the start of the DHCP Range. This allows the IP's 192.168.1.110 to 192.168.1.254 to have DHCP assigned PC's on it. We need the static range which is 192.168.1.100 to 192.168.1.109.
You need to set a suitable range for yours. I suggest you follow mine as much as possible, despite slight differences in the IP's.
When you have selected a range, save the settings on your router.
Next you need to set the IP address on the computer acting as a server.
1. Right click "My Network Places" on your desktop and click "Properties" (or double click "Network Connections" in Control Panel).
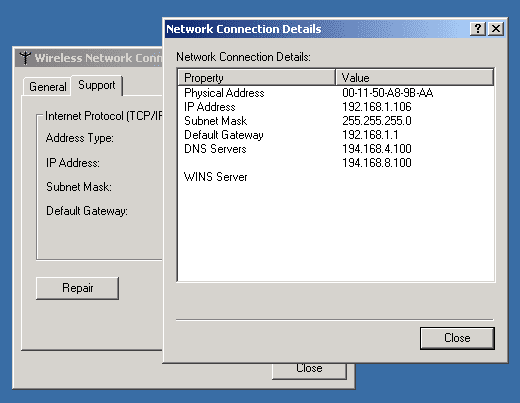
2. Now right click the network adaptor and click "Status". On the box that appears click the "Support" tab then click the "Details" button.

3. Copy down the details you see in the box, especially the DNS Servers.
4. Now click OK until you get back to the screen with the network adaptors on it.
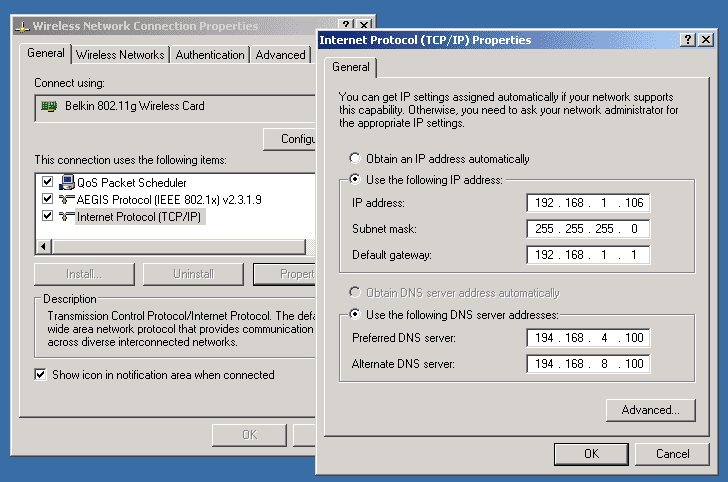
5. Now right click the network adaptor and click "Properties". On the box that appears, click on the TCP/IP protocol, then click the "Properties" button.
6. Now enter the details you just copied down into the boxes and enter an IP address that is outside the DHCP range you specified. This will be the servers new permanent IP.

6. Now click "OK" on both boxes and the IP address should be changed.
7. Now check that your internet still works by browsing to a site you have not visited recently. This ensures the browser is not pulling the site up from the cache.
8. Now that the internet is working, you need to change your port forwarding settings to point to the new IP address of the server. Once you have done that and applied the settings, you have finished.
You should never have to change any of these settings again unless you hard reset your router, change the IP settings or reinstall Windows.
Change the Index File
Installing Abyss Web Server
Installing a DNS Server
Installing hMailServer Mail Server
Installing MySQL Database Server v4.0.24
Installing MySQL Database Server v4.1
Installing PHP
Installing phpMyAdmin
Installing ActiveState Python
Installing ActiveState Ruby on Rails
Port forward your router
Or go back to the AbyssUnderground homepage
Why do I want to do this?
People who run servers do so by setting a port forwarding rule in their router. Because their IP address is automatically assigned to the computer by the router each time you turn it on, it is possible for this IP address to change if you have more that 1 computer on your LAN. If this happens the port forwarding rule becomes invalid. Because of this your website and other services that require port forwarding will fail. To get it working again you have to change the port forwarding rule to the newly assigned DHCP address. Static LAN IP Addresses stop this from happening.How do I set a static LAN IP?
Start by accessing your routers console and finding the "DHCP" page. It will contain thing like DHCP Enable/Disable, DHCP Range.Mine looks like this:

My router has the "Starting IP Address" as the field we need to set. I set mine to 192.168.1.110 as the start of the DHCP Range. This allows the IP's 192.168.1.110 to 192.168.1.254 to have DHCP assigned PC's on it. We need the static range which is 192.168.1.100 to 192.168.1.109.
You need to set a suitable range for yours. I suggest you follow mine as much as possible, despite slight differences in the IP's.
When you have selected a range, save the settings on your router.
Next you need to set the IP address on the computer acting as a server.
1. Right click "My Network Places" on your desktop and click "Properties" (or double click "Network Connections" in Control Panel).
2. Now right click the network adaptor and click "Status". On the box that appears click the "Support" tab then click the "Details" button.

3. Copy down the details you see in the box, especially the DNS Servers.
4. Now click OK until you get back to the screen with the network adaptors on it.
5. Now right click the network adaptor and click "Properties". On the box that appears, click on the TCP/IP protocol, then click the "Properties" button.
6. Now enter the details you just copied down into the boxes and enter an IP address that is outside the DHCP range you specified. This will be the servers new permanent IP.

6. Now click "OK" on both boxes and the IP address should be changed.
7. Now check that your internet still works by browsing to a site you have not visited recently. This ensures the browser is not pulling the site up from the cache.
8. Now that the internet is working, you need to change your port forwarding settings to point to the new IP address of the server. Once you have done that and applied the settings, you have finished.
You should never have to change any of these settings again unless you hard reset your router, change the IP settings or reinstall Windows.
Finished
Related Pages
Change the Index File
Installing Abyss Web Server
Installing a DNS Server
Installing hMailServer Mail Server
Installing MySQL Database Server v4.0.24
Installing MySQL Database Server v4.1
Installing PHP
Installing phpMyAdmin
Installing ActiveState Python
Installing ActiveState Ruby on Rails
Port forward your router
Or go back to the AbyssUnderground homepage