Creating image slices with Macromedia Fireworks MX
BACK
Creating graphical websites is a lot nicer than a plain basic site, but how do you get the images aligned and layed out perfectly? The answer is simple: Macromedia Fireworks MX.
Macromedia Fireworks is a very easy to use program once you have mastered the basics. It works in a similar way to Adobe Photoshop in the way it uses images and manipulated them. The main feature this program has is the 'slices' feature, and this is the one we will be focusing on in this tutorial.
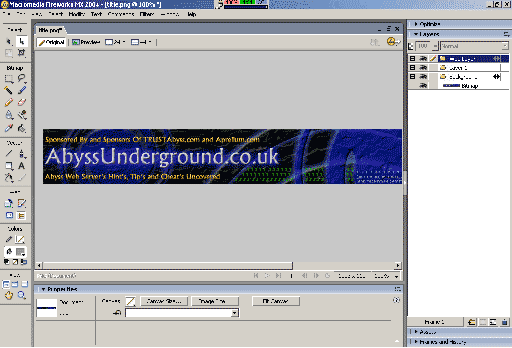
The first thing you need to do is to open the program and have an image ready to 'slice'. This image can be anything from just a large image that takes a while to load (like my title image) or a template for a website made in Adobe Photoshop or similar program that need slicing and HTML added to make it into your website.
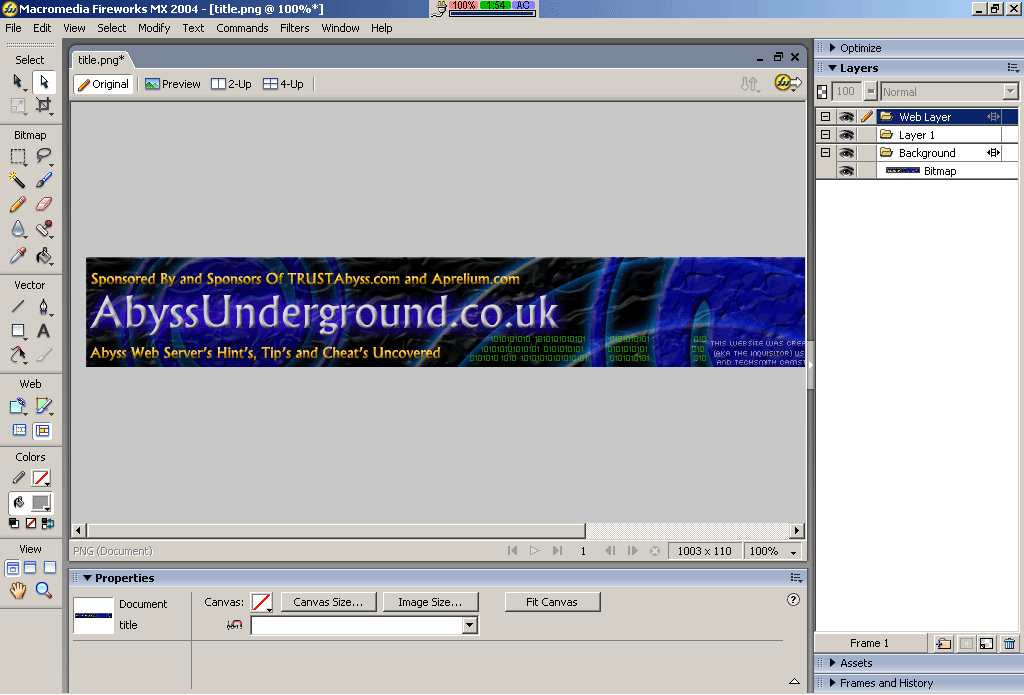
In this tutorial I am going to use my title image. When you have loaded the image you should see a screen like the one in the screenshot below.
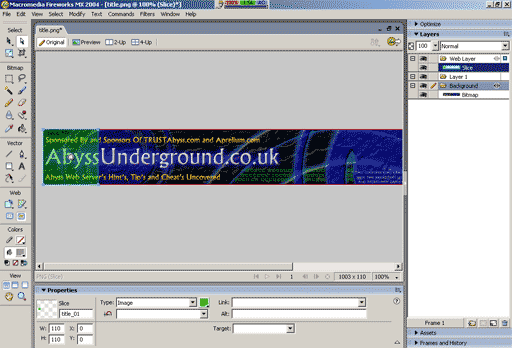
Once you have the image open you need to decide how many slices you need or how you want to slice it. I have chosen a simple 'box' slice but you may have to use other ways depending on how complex the image is. The hard part for a website template based image is getting the slices right and getting the HTML in a way so you can put text onto the page over the top of the image or as part of the template.
Once you have decided, you need to click the 'slice' tool button.
 This tool will allow you to 'draw' the slices onto the image so you know where the slices will be. Spend as much time as you need to on this as it is the hardest part of the tutorial. Make sure you cover all the areas of the image otherwise when we come to export the slices and the HTML, the program will include the missed parts, but probably not in the way you want it to.
Now draw onto the image the slices you want just as I have shown in the screenshot below.
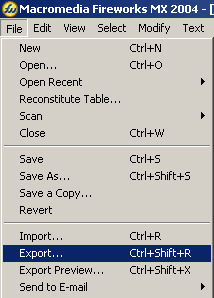
Once you have filled in the whole image with slices, we can now save and export the HTML and Images. If you have an existing template you just want to add a sliced image to, to make it load in sections then follow export procedure 1. If you have an image to make an entirely new template, follow export procedure 2.
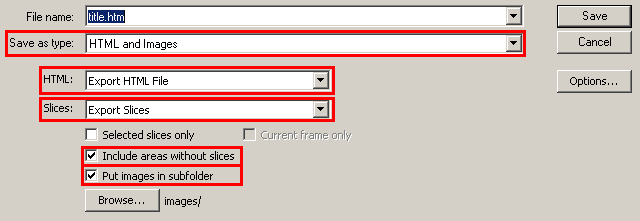
Now a box will appear for you to enter where you want to save. For now we will save to the desktop.
On the box you will need to click some of the items before we actually do save. This will ensure it is easier for us to manage later on in the tutorial. In the box below make sure all the options marked with a red box is the same as on the picture. This will make sure that everything is the same so you don't get confused.
Once you have selected a filename and checked the image with your options you can click 'save'. There should now be two items on your desktop. A HTML file and a folder called 'images'. This is the contents of the export so don't lose them!
To put the sliced image into your current HTML page you need to select the HTML from the file on the desktop and past it into your current HTML file where you want the image to appear. Now we don't need all of the HTML, just some of it. The image below shows the part of the HTML we need, which is highlighted.
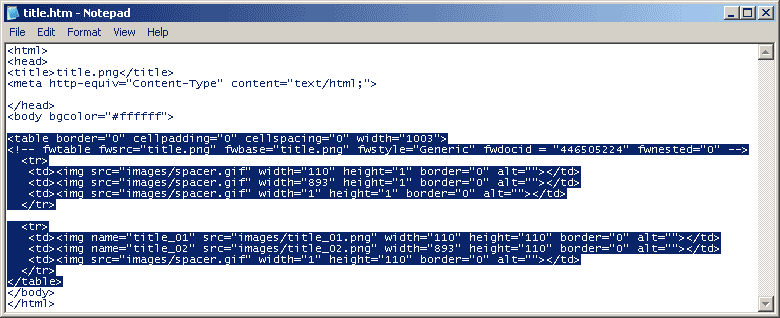
This is the code that we will paste into the existing HTML page to insert the image. Do this now.
Next we need to transfer the images from the 'images' folder. If you don't already have an images folder then simply copy the folder into the same directory as the file you pasted the code into. If you do have an images folder then open the folder on the desktop and highlight all the files. Right click, click 'copy'. Now go to the images folder for your website, open it and right click, then click 'paste'. The files will copy into that folder as well as leaving them in the folder on the desktop.
Open your website and the image should load with all the different slices. If you do this locally then you won't see the images load but if you upload to your webserver (or you have abyss with bandwidth limits) then you should see the images load indivisdually.
Now a box will appear for you to enter where you want to save. For now we will save to the desktop.
On the box you will need to click some of the items before we actually do save. This will ensure it is easier for us to manage later on in the tutorial. In the box below make sure all the options marked with a red box is the same as on the picture. This will make sure that everything is the same so you don't get confused.
Once you have selected a filename and checked the image with your options you can click 'save'. There should now be two items on your desktop. A HTML file and a folder called 'images'. This is the contents of the export so don't lose them!
This is now your website so we need to devise a way of getting your information onto it. The easiest way by far is to use DIV or SPAN tags with HTML and align them 'absolutely' by the pixel to the page. This is easy because if you have a main content area in the middle of the page then the DIV or SPAN tag can simply be aligned in the middle of the page.
A DIV and SPAN tag looks like this:
Aligning the text will be difficult and time consuming but once you have done one page you can simple copy and paste the rest. Another easy solution would to use iFrames (Inline Frame) but I won't go into detail as to how these work, you can do that for yourself!
This is the end of the tutorial. I hope you found this tutorial helpful and that you use it for your own website.
Creating graphical websites is a lot nicer than a plain basic site, but how do you get the images aligned and layed out perfectly? The answer is simple: Macromedia Fireworks MX.
Macromedia Fireworks is a very easy to use program once you have mastered the basics. It works in a similar way to Adobe Photoshop in the way it uses images and manipulated them. The main feature this program has is the 'slices' feature, and this is the one we will be focusing on in this tutorial.
The first thing you need to do is to open the program and have an image ready to 'slice'. This image can be anything from just a large image that takes a while to load (like my title image) or a template for a website made in Adobe Photoshop or similar program that need slicing and HTML added to make it into your website.
In this tutorial I am going to use my title image. When you have loaded the image you should see a screen like the one in the screenshot below.
Once you have the image open you need to decide how many slices you need or how you want to slice it. I have chosen a simple 'box' slice but you may have to use other ways depending on how complex the image is. The hard part for a website template based image is getting the slices right and getting the HTML in a way so you can put text onto the page over the top of the image or as part of the template.
Once you have decided, you need to click the 'slice' tool button.
This tool will allow you to 'draw' the slices onto the image so you know where the slices will be. Spend as much time as you need to on this as it is the hardest part of the tutorial. Make sure you cover all the areas of the image otherwise when we come to export the slices and the HTML, the program will include the missed parts, but probably not in the way you want it to.Now draw onto the image the slices you want just as I have shown in the screenshot below.

Once you have filled in the whole image with slices, we can now save and export the HTML and Images. If you have an existing template you just want to add a sliced image to, to make it load in sections then follow export procedure 1. If you have an image to make an entirely new template, follow export procedure 2.
Export procedure 1 - Just a sliced image
Now that you have all of the slices made, we need to export the image for you to place on your website. Click the 'File' menu, then 'Export' in Macromedia Fireworks.Now a box will appear for you to enter where you want to save. For now we will save to the desktop.
On the box you will need to click some of the items before we actually do save. This will ensure it is easier for us to manage later on in the tutorial. In the box below make sure all the options marked with a red box is the same as on the picture. This will make sure that everything is the same so you don't get confused.
Once you have selected a filename and checked the image with your options you can click 'save'. There should now be two items on your desktop. A HTML file and a folder called 'images'. This is the contents of the export so don't lose them!
To put the sliced image into your current HTML page you need to select the HTML from the file on the desktop and past it into your current HTML file where you want the image to appear. Now we don't need all of the HTML, just some of it. The image below shows the part of the HTML we need, which is highlighted.
This is the code that we will paste into the existing HTML page to insert the image. Do this now.
Next we need to transfer the images from the 'images' folder. If you don't already have an images folder then simply copy the folder into the same directory as the file you pasted the code into. If you do have an images folder then open the folder on the desktop and highlight all the files. Right click, click 'copy'. Now go to the images folder for your website, open it and right click, then click 'paste'. The files will copy into that folder as well as leaving them in the folder on the desktop.
Open your website and the image should load with all the different slices. If you do this locally then you won't see the images load but if you upload to your webserver (or you have abyss with bandwidth limits) then you should see the images load indivisdually.
Export procedure 2 - A sliced website template
Now that you have all of the slices made, we need to export the image for you to place on your website. Click the 'File' menu, then 'Export' in Macromedia Fireworks.Now a box will appear for you to enter where you want to save. For now we will save to the desktop.
On the box you will need to click some of the items before we actually do save. This will ensure it is easier for us to manage later on in the tutorial. In the box below make sure all the options marked with a red box is the same as on the picture. This will make sure that everything is the same so you don't get confused.
Once you have selected a filename and checked the image with your options you can click 'save'. There should now be two items on your desktop. A HTML file and a folder called 'images'. This is the contents of the export so don't lose them!
This is now your website so we need to devise a way of getting your information onto it. The easiest way by far is to use DIV or SPAN tags with HTML and align them 'absolutely' by the pixel to the page. This is easy because if you have a main content area in the middle of the page then the DIV or SPAN tag can simply be aligned in the middle of the page.
A DIV and SPAN tag looks like this:
<DIV style="width:300px; height:300px; position:absolute; left:100px; top:350px">

Your content goes here

</DIV>
<SPAN style="width:300px; height:300px; position:absolute; left:100px; top:350px">

Your content goes here

</SPAN>
Aligning the text will be difficult and time consuming but once you have done one page you can simple copy and paste the rest. Another easy solution would to use iFrames (Inline Frame) but I won't go into detail as to how these work, you can do that for yourself!
This is the end of the tutorial. I hope you found this tutorial helpful and that you use it for your own website.